Nextcloud - Installing the server
Before starting the process of installing Nextcloud, first it must be decided what the server will look like. For this to be decided it is necessary to know what are the requirements that the server must fulfill.
For me, the most important thing is that the server is easy and fast to setup and backup. As a consequence, the obvious installation that presents itself is the AIO docker image of Nextcloud. Next, it must be chosen what will run Docker. Proxmox as a supervisor for the OS was one valid solution that would be almost ideal for this, but since dedicated and not really powerful HW will be used for the server, a better approach would be a native OS install so Ubuntu it is. I have chosen the Server 22.04.2 LTS version because of a couple of reasons.
Why 22.04.2 LTS?
Because, as the name suggests, it has relatively long term support. It has guaranteed OS security updates until April 2027. with extended security maintenance until April 2032.
Why Server and not the Desktop version?
Server versions generally have less bloat than the Desktop versions meaning that it reduces the security risks from all the unnecessary software that is installed by default with the Desktop version. The more software there is installed, the greater the attack surface. Also, if needed in the future, GUI can always be added.
Installing Ubuntu Server 22.04.2 LTS
The complete process of installing the Ubuntu Server 22.04.2 LTS can be found on this blog post: Installing Ubuntu Server 22.04.2 LTS
Steps after the installation
First thing that is needed to be done on a new build is to update the system and the apps. To do this, the following commands must be executed:
sudo apt update
sudo apt dist-upgrade
The system or some applications might need to be restarted and the user shall be prompted to do so. In any case, I would suggest a reboot after the update just to keep things clean. The command for restart is:
sudo shutdown -r now
After this is done and after following all the steps from the installation, the server machine is now set up and ready to be used as far as the Ubuntu installation goes.
Formatting a drive and creating a partition
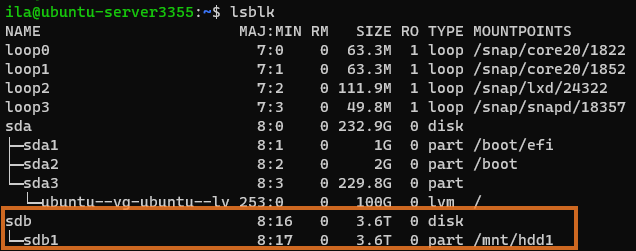
Formatting a drive and creating and mounting a partition is necessary to be performed in order to use the drive for the Nextcloud application. The first thing that is needed to be done is to identify which drive needs to be formatted. This can be accomplished with a simple command:
lsblk
This gives the following output:
ila@ubuntu-server3355:~$ lsblk
NAME                      MAJ:MIN RM   SIZE RO TYPE MOUNTPOINTS
loop0                       7:0    0  63.3M  1 loop /snap/core20/1822
loop1                       7:1    0  63.3M  1 loop /snap/core20/1852
loop2                       7:2    0 111.9M  1 loop /snap/lxd/24322
loop3                       7:3    0  49.8M  1 loop /snap/snapd/18357
sda                         8:0    0 232.9G  0 disk
├─sda1                      8:1    0     1G  0 part /boot/efi
├─sda2                      8:2    0     2G  0 part /boot
└─sda3                      8:3    0 229.8G  0 part
  └─ubuntu--vg-ubuntu--lv 253:0    0   100G  0 lvm  /
sdb                         8:16   0   3.6T  0 disk
└─sdb1                      8:17   0   3.6T  0 part
It can be seen that the sdb disk and the sdb1 partition located on the disk are not mounted anywhere, but are present. This disk is of the size 3.6T which is the size of the 4TB physical disk that is attached to the PC.
If the disk happens to be mounted, as seen in the picture below:
Before being able to work further on the disk and it’s partitions, it must be unmounted first. It can be seen that it is mounted as /mnt/hdd1. In order to unmount it, the following command is used:
sudo umount /mnt/hdd1
- Yes, the command is
umountand notunmount. It is not a typo.
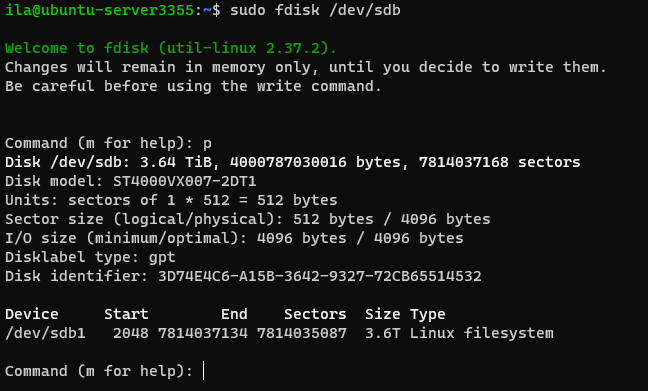
In order to format the disk, fdisk utility shall be used. Knowing that the disk that needs to be formatted is named sdb, the appropriate fdisk command is:
sudo fdisk /dev/sdb
This will open the fdisk utility for the selected disk and by entering the letter ‘p’, the partition table for the disk can be printed:
In order for the disk to be formatted, a new partition table first needs to be created. A GPT partition table shall be created by entering the letter ‘g’ and pressing Enter. This will delete all the partitions so a new partition must be created.
A new partition is created by entering the letter ‘n’ and this will start a new partition walkthrough. For the partition number, for the first partition, the default of 1 is fine, so just press ‘Enter’. For the First sector, there is no need to change the default, so ‘Enter’ again, and for the last sector, if a specific partition size should be created, then this value should be changed appropriately, and if the entire disk size is to be used for the partition, then it can be left as the default value ‘Enter’ can be pressed again.
Now that everything is set, the changes are still not written to the disk. In order for the changes to be written to the disk, the letter ‘w’ must be entered as the command. After this, the disk has a new partition table and a new partition.
Note that at this point the partition is not yet formatted. In order to format the partition, the ‘mkfs’ command needs to be used. In order to format the sdb1 partition as ext4 the following command should be used:
sudo mkfs.ext4 /dev/sdb1
If it was to be formatted as exFAT, the following packages must first be installed:
sudo apt install exfat-utils exfat-fuse
And now the command for formatting would be:
sudo mkfs.exfat /dev/sdb1
Mounting and automatically mounting the drive after reboot
Now that the partition table and partition have been created and the partition has been formatted to the ext4 partition format, in order for the system to be able to use the new partition, it first needs to be mounted. The partition can be mounted in either of the two locations (by convention): /mnt and /media. By convention, the ‘/mnt’ is used for internal (e.g. HDD, SSD, NVMe…) and ‘/media’ is used for external storage (e.g. SD Card, Flash Drive, External HDD…).
As the drive that is being used here is an internal drive, it shall be mounted in the ‘/mnt’ folder and it shall be mounted as ‘hdd1’ (arbitrary name that I’ve made up). For this to be done, two things need to be done:
- Create the folder where the storage shall be mounted
- Find the UUID of the partition in order to mount it
Creating the mountpoint
The mountpoint is created by simply creating the folder where the partition should be mounted:
sudo mkdir /mnt/hdd1
Now that the mount point is created, the drive can be mounted easily with the following command (if the drive is detected as sdb) :
sudo mount /dev/sdb1 /mnt/hdd1/
Note that the name of the sdb drive can change if a new disk is added so it is advisory to refer to it using it’s UUID.
Finding the UUID of the partition
The UUID for the partition (once the partition is known (in this example sdb1)) can be found using the command blkid:

Automatically mounting the partition after reboot
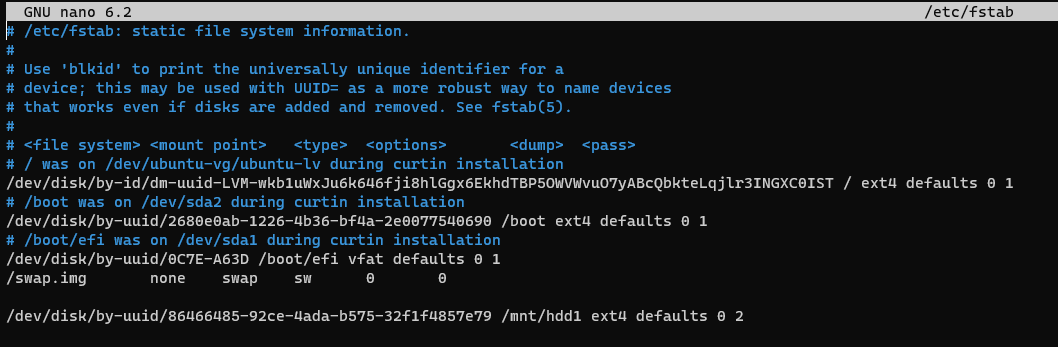
In order for the partition to be able to be mounted automatically after reboot, the fstab file fill need to be modified so that the partition that should be mounted is included in that file as well as the mountpoint where the partition is to be mounted. In order to be able to modify the file, the file must be opened in an editor and nano will be used for this job:
sudo nano /etc/fstab
Once open, add the following line to the end of the file
/dev/disk/by-uuid/86466485-92ce-4ada-b575-32f1f4857e79 /mnt/hdd1 ext4 defaults 0 2
So that the file looks like the picture below:
Note that the following line is equivalent to the previous one:
UUID=86466485-92ce-4ada-b575-32f1f4857e79 /mnt/hdd1 ext4 defaults 0 2
After the fstab file has been edited, close out of nano and save the changes. It is a good practice to “test” the fstab file by running the command:
'sudo mount -a'
If that command passes without an error, the fstab file should work fine and the mount options can be checked with the lsblk command.
Useful commands and utilities
'df -h'
Shows how much space is used for any of the mounted filesystems.
Utility for checking what is using up the disk space. It can also be used to navigate to and delete unneeded files.
Install the ncdu utility
sudo apt install ncdu

sudo ncdu /

sudo ncdu / -x